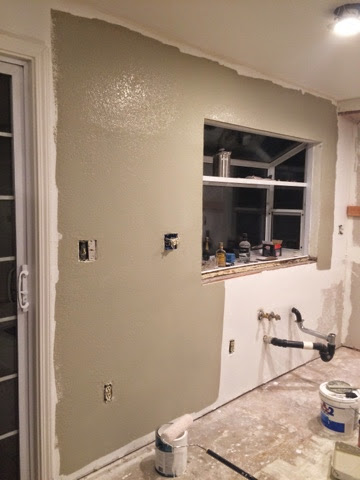
When we demolished the original kitchen cabinets and backsplash, we ended up taking out large chunks of drywall from the walls...
Rather than just patching up the holes, we decided to re-drywall everything to match the ceiling, and to replace the old insulation. By doing so, it would make it easier for us to match the new texture to the rest of the house (and maybe save some money on our energy bills), without everything looking patchy.
And so, we were left with this...
The first step was to nail on the new drywall onto the studs and then mud over the gaps between each panel.
**We completed this process just like we did on the roommates bathroom upstairs and the ceiling
This process took longer than expected though because, on top of our really hectic schedules, we could only do little bits each day since we had to let every coat dry.
We also ran into little hiccups along the way, like the vent....
Yes, that vent on the ceiling.
We forgot to take into account that the new cabinets around the fridge were going to stick out further than the old ones, and for that reason the vent would be covered! We had to move it.
This process set us back a bit, but it all was taken care of :)
I used a large mixing bucket to dilute the drywall mud to the consistency somewhere between soft serve ice cream and creamy peanut butter.
We then emptied this into the spitter machine! While Brad sprayed, I would make more. This definitely saved a lot of time!
And then we waited for it to dry for about 10-15 minutes. At this point, the texture should look a little bit wet, and when you trile over it with the puddy spatula thing, it should flatten evenly. If it's too wet, the mounds you just splattered on will flatten completely and if it's not wet enough, they won't flatten at all or you will scrape them off. I would suggest testing it on little areas of the wall where it won't show much, just to be sure it's ready.
This is the part I love doing because it's fast, fun, and you get instant results!
These are the tools you need...
You have to hold the large puddy tool almost flat against the wall or ceiling you are working on, then apply enough pressure to flatten the mounds enough, but not too much that they flatten completely. If you scrape off the mounds because the tool is perpendicular to the wall, you have to respit, and that's never fun.
After this step was finished, we let it dry for about an hour and then painted!
We sealed off the area where the sink would be with a paint calls Killz. This paint kills mold and prevents new mold from forming. Also, we used a satin paint enamel in the same color as our other walls, because it was going into the kitchen. The satin finish is good for areas with high traffic or moisture, like kitchens!
And that concluded our Friday night! The next morning, the boys were up extra early to put in the cabinets!!!


No comments:
Post a Comment